KB: SPF, DKIM and DMARC
What are SPF, DKIM and DMARC?
SPF, DKIM and DMARC are technologies implemented by email providers to check whether email comes from where it claims to. Many large email providers require the sender to implement these technologies for certain types of sender. In particular, bulk email senders (newsletters, marketing emails, etc) should do so in order to reduce the chances of misclassification as spam.1
To skip the description of the technologies and go straight to the implementation, click here.
Background
Email is a fairly old technology. It was designed in a time where the internet was small enough that everyone connected to it knew everyone else. Trust was assumed so no security was needed. There were no worries about spam.
The internet isn’t like that any more, of course. Spam is, unfortunately, everywhere. Even worse, the lack of security in the design of email means that spammers can make up the address that the email was sent from.
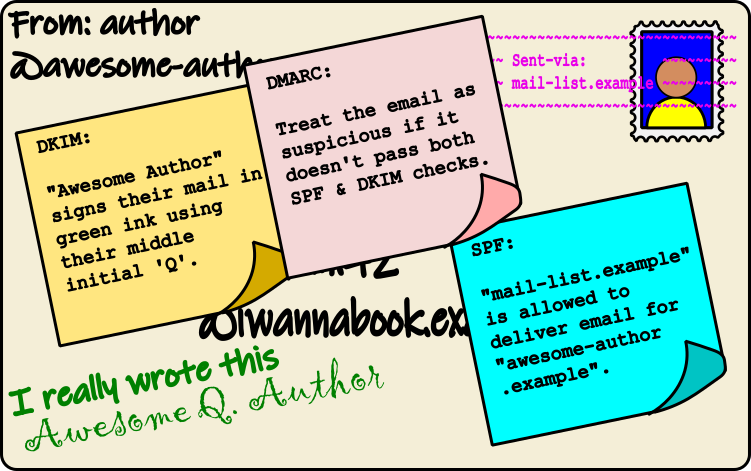
Since email was based on postal mail, a postal envelope makes a decent analogy for various important parts of the email system.
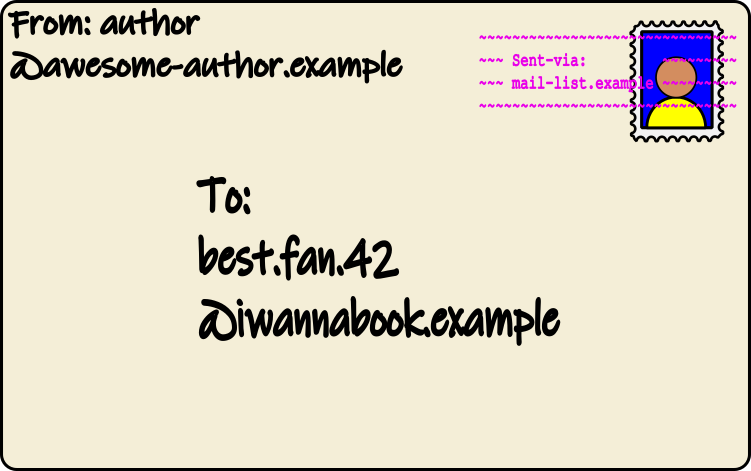
On a postal envelope, there are a number of pieces of important information that are placed on the front. You have:
- the address of the recipient
- the address of the sender
- the stamp
- a postmark/cancellation mark over the stamp
Most of these are pretty obvious but the postmark needs a bit more discussion. It depends on the postal system in your country, but the postmark serves a few different purposes:
- by printing it over the stamp, it prevents the stamp from being peeled off and used again
- it includes the date that the postal service started processing the envelope
- it shows the name of the sorting centre that first processed it
That’s enough about postal mail for now but keep these things in mind because they (mostly) have equivalents in email.
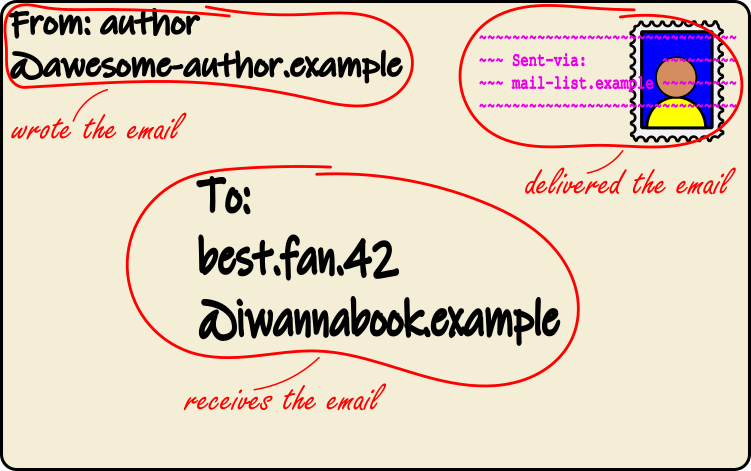
The “headers” of an email provide much of the same functions as an envelope, as illustrated above:
- the address of the person the email is going to
- the address of the person who wrote the email2
- a “postmark” with the name of the email server that handled the email
The only thing missing is the stamp! The postmark isn’t really part of the email – it’s worked out by the recipient’s email provider when the email is received – but can be thought of as part of the email.3
So what does all this have to do with spam? If you think about postal mail, there is nothing stopping a bad actor from writing anything they like as the return address on the envelope. It’s exactly the same with email: a spammer (or other malicious person) can make up the return email address.
If a spammer uses your email address to send out their emails, email providers providers might end up blocking your email address. If they do, there’s not much you can do about it either! The only thing you can do is prevent it from happening in the first place.
Sending lots of emails of your own – for example, if you run a mailing list or newsletter – can also look like spam to email providers.
How to not look like spam
SPF, DKIM and DMARC are a triad of technologies that, if implemented, make your email address appear more trustworthy to email providers. They do this by proving that the sender address of the email actually belongs to the sender.
DNS and domains
Before getting to the details about how each of these technologies work, first a brief note on domains.
The domain of an email address is everything after the ‘@’. All three of the technologies operate on domains: they specify the rules and restrictions at the domain level. Every email address that shares the same domain has the same rules applied to it; you can’t set different rules for “author@” and “other@”, for example.
The configuration for the techologies is provided by DNS (Domain Name System) – the system that is used to look up information for domains. The settings are stored in “TXT records”. When setting up each of these, appropriate TXT records for your domain will need to be added to your domain’s DNS configuration.
SPF
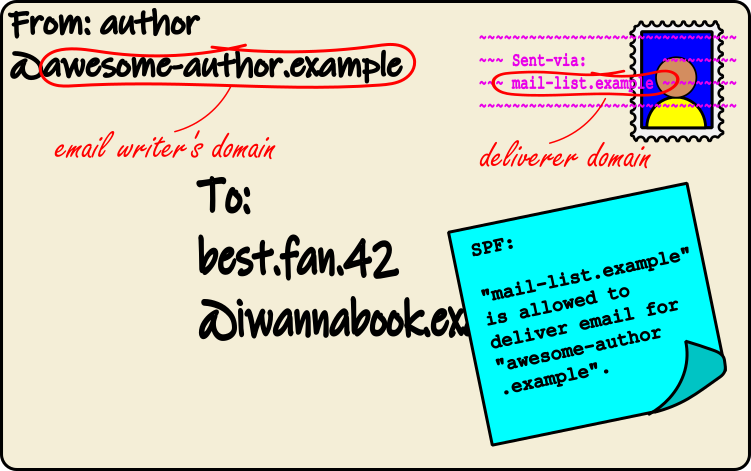
SPF – Sender Policy Framework – is a way of declaring which email servers (in the envelope analogy: post sorting centres) are allowed to send email for your domain. When an email is received, the SPF policy for the return address’ domain is looked up. It then checks whether the delivering mail server (the postmark) is allowed by that policy. If it is, the email is good. If not, it’s suspicious.
This cuts down on a lot of spam but isn’t fullproof. If you use a large public email provider for your domain (for example, GMail or MailerLite) then SPF would permit any email from those senders. This isn’t much of a problem in practice (as the providers don’t normally allow you to send from a faked address ) but adding DKIM closes that hole.
DKIM
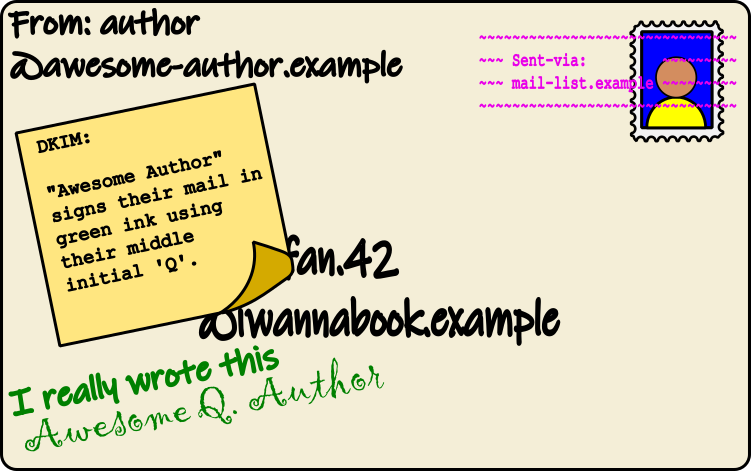
DKIM – Domain Keys Identified Mail – adds a signature to emails. This signature (unlike a real signature!) is designed to be very difficult to forge, even if you have seen an email signed by that sender before. One of the reasons for this is that the signature depends on the contents of the email: if the contents of the email change, the signature won’t be valid for that email any more. This prevents someone from copying the signature on to an email that they created then pretending it came from you.
Like with SPF, the recipient’s email provider checks the DKIM policy for the domain in the return email address. Messages that pass a DKIM check are more likely to be trustworthy than those that do not.
DMARC
Between SPF and DKIM, we have two things:
- SPF proves the mail server is allowed to send email for the claimed email address.
- DKIM proves that the person who wrote the email is allowed to send email using that address.
So, between them, both the writer and deliverer have been checked. On top of this DMARC – Domain-based Message Authentication, Reporting and Conformance – instructs the recipients email provider to be strict about checking the email’s sender addresses. It also provides the ability to customise how the provider should treat emails that fail the checks.
Implementing SPF, DKIM and DMARC
The assumption in this section is that you want to be able to send mail via a mailing list/newsletter provider and that you also want to be able to use your email address in the normal way.
Each provider needs its own, specific configuration and it is not possible to catalogue all of the possibilities here. Appropriate values for some popular services will be given here but if your provider is not listed, you will have to use their help pages to find out what settings to use.4
To implement SPF, DKIM and DMARC, you will need the following things:
- your login information for your DNS/hostname provider
- the SPF policy appropriate for your email provider(s)
- the DKIM public key for each of your provider(s)
- an email address to use for DMARC reports this will be public
You should also have a basic knowledge of how you can configure DNS records for your DNS/hostname provider. In particular, you will need to be able to add and edit TXT records for your domain.
Important note: Incorrectly configuring these settings can break your email setup. This guide will describe how to initially set up the policies in a permissive way that will allow you to test the setup without enforcement by the recipients of the emails. Care still needs to be taken to avoid typos and other errors in the configuration, however.
It is not recommended to enable all of these features at the same time. An interval of 48+hrs is recommended between each to give time for any email issues to be noticed.5 For some policies (DMARC), you will need to tweak the policy to enable enforcement once you’re sure it is working as the policy suggested here is non-enforcing by default.
For demonstration purposes, this section will use the email address “person@yourdomain.example” and the domain “yourdomain.example”.
Email providers
Google Workspace / GMail
This section applies if you are a Google Workspace customer. It is not possible to set up custom SPF, DKIM and DMARC rules using a normal GMail account.
To access the Google Workspace admin console, go here.
SPF record
This record only applies if Google is the only provider of email services for your domain. If not, it will need to be merged with the SPF records for the other provider(s) as described later.
At the time of writing, the GMail SPF record is
v=spf1 include:_spf.google.com ~all.
DKIM record
To generate a DKIM key and record for GMail, go to Apps -> Google Workspace -> Gmail. Find and select the “Authenticate Email” category. In this screen, choose the option to generate a DKIM key for your domain. After a delay, you will be shown the DKIM configuration you should use.
The DNS host name it gives will be “google._domainkey”, which indicates that this DKIM configuration should be entered into a TXT record for “google._domainkey.yourdomain.example”.
The record value will be specific for your domain. Make a note of it. Do not enable authentication until you have added the DKIM entry to your DNS configuration.
DMARC reporting address
If you do not have an email address set up for dealing with reports about email problems (this is sometimes called a “postmaster” address), you can set up a mailing group in Google Workspace to handle any incoming reports. Using a group for this means that it isn’t tied to an individual person (or their email address).
In the Google Workspace admin console, go to the “Directory” -> “Groups” item in the left-hand menu. Select “Create Group” to create a new group. Enter something appropriate for the group name and email, for example “Email postmaster” and “postmaster”. Check that “Mailing” is ticked and “Security” is not ticked.
On the next screen, set the access type to “Restricted”. Enable the “Who can post” option for “External” (this will also enable it for “Entire organization” too).
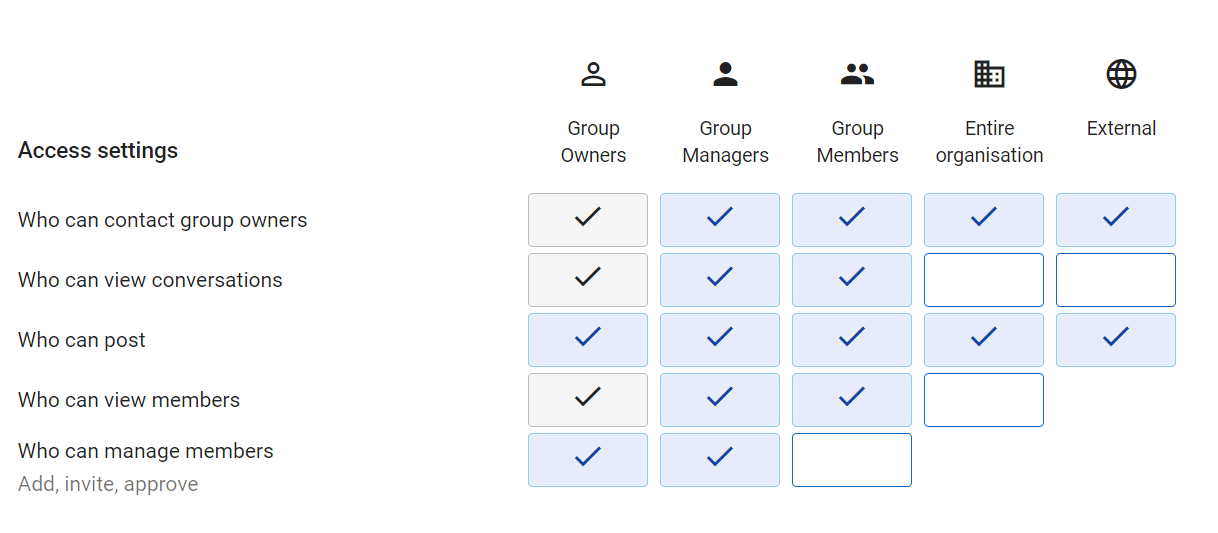
Select “Create Group” at the bottom and the group will be created. As the creator of the group, you will automatically be a member of the group. Add any other users in your Google Workspace organization that will be administering your email.
The rest of this document will assume you created the mailing group “postmaster@yourdomain.example”.
Other notes
Google Workspace provides some tooling for validating that SPF and DKIM are set up in the correct way for GMail. The Google Apps MX Checker allows you to enter your domain and have Google check various mail-related DNS records are set up properly.
MailerLite
For both the SPF and DKIM records for MailerLite, see their help page for domain verification and authenciation.
SPF record
To get an SPF record, follow the instructions on the MailerLite help page.
This record will typically be v=spf1 a mx include:_spf.mlsend.com ~all.
DKIM record
To get a DKIM record, follow the instructions on the MailerLite help page.
Instead of giving you a DKIM TXT entry to add to your DNS, it will instruct you to add a CNAME entry instead. This CNAME entry will tell an email provider to look at another DKIM TXT record provided by MailerLite to get the configuration.
This CNAME entry will typically be for litesrv._domainkey.yourdomain.example
and will redirect it to litesrv._domainkey.mlsend.com.
Notes
MailerLite has a process of domain “verification, authentication and alignment”. It is strongly recommended that you complete all three of these but the first two should be considered vital.
A domain is verified by proving you can receive email at that domain. This would normally be done by having another mailing provider on that domain for sending and receiving non-bulk email (e.g. Google Workspace’s Gmail app). If you don’t intend on using the domain for non-bulk email, authenticating the domain will implicitly verify the domain too so this step can be skipped.
To authenticate a domain, appropriate SPF and DKIM records have to be added to the domain and these have to exactly match the values that MailerLite instructs you to use. If you are using another email provider, you should start off by adding both provider’s SPF records as separate TXT records then running the MailerLite domain authentication step. The authentication will fail due to having multiple SPF records but this is expected at this step. Once it fails, MailerLite will tell you what merged record you should set instead. Remove all but one of the SPF TXT records and replace the contents of the remaining record with the value MailerLite instructs. You should now be able to authenticate your domain (though you may have to wait for DNS timeouts to expire).
Domain alignment is separate from SPF but can be used to enhance the reputation
that email providers assign to your emails. It works by creating a subdomain
within your domain (e.g. lists.yourdomain.example) that will be used for your
MailerLite email. If you are using domain alignment, the SPF record you add to
the subdomain should be exactly the one specified by MailerLite and should not
be merged with your other email provider’s SPF (this is because your other
provider will still be sending from address@yourdomain.example and not
address@lists.yourdomain.example).
Outlook
SPF record
The SPF record for Outlook is v=spf1 a include:spf.protection.outlook.com -all.
Merging records
If you are using multiple providers for your email services, you will likely have to merge the policies for those providers. Each type of record is handled differently.
SPF
All of the SPF records should begin v=spf1 (no other version of SPF is defined
at the time of writing). The combined record should also begin with a single
v=spf1.
Next, the records may have zero, one or both of a and mx. If any of the
records have a, add a single a. If any of the records have mx, add a
single mx.
Any include, ip4 or ip6 entries should be added to the combined record.
Finally, the records may end with +all, ?all, ~all or -all. These mean,
respectively, “success”, “neutral”, “soft fail” and “fail”. The first two are
generally not useful as “success” marks any sender as passing the SPF check
(defeating the point of SPF!) while “neutral” tells the receiver to act like
there was no SPF record at all (and thus bring back the risk of classifying the
email as spam).
The differences between ~all and -all are that a “soft fail” will usually
cause the email to be accepted but placed into the user’s spam folder while a
“hard fail” will cause it to be rejected outright and the user will not be aware
that any email was received (it doesn’t even go to spam). It is recommended that
you start with ~all initially and consider moving to -all when you’re
confident that you can send email from all of your providers.
As an example, the combined record for Google and MailerLite is
v=spf1 a mx include:_spf.google.com include:_spf.mlsend.com ~all.
DKIM
Merging DKIM records should not be required (and is not possible anyway). Each email provider should be configured to use a different DKIM selector. A separate TXT record can then be created for each selector.
DMARC
The DMARC configuration doesn’t depend on your email service providers. A good
starting point for your DMARC policy is
v=dmarc1;p=none;rua=mailto:postmaster@yourdomain.example;. Note that unlike
the SPF and DKIM configurations, the settings are separated by semicolons and
not spaces.
The p entry can be any of p=none (do nothing if checks fail), p=quarantine
(put failing emails into spam) or p=reject (reject the email). Do not change
the policy to quarantine or reject until you are sure that emails are being
received properly. If emails are being rejected, the recipient’s email provider
should send you reports to the email address specified in rua=mailto:.
If you would like to do a gradual roll-out of DMARC, you can add pct=x entry
(e.g. pct=10). This will instruct the recipient’s email provider to only apply
the DMARC policy in the given percentage of cases (the default is pct=100).
The TXT record for the DMARC policy will be attached to the
_dmarc.yourdomain.example domain name.
DNS providers
Generic information
Namecheap
WIP - coming soon!
Hover
WIP - coming soon!
Footnotes
-
Emails from senders implementing all of these technologies are not immune from having their emails classified as spam but it makes it less likely. Essentially, the email providers give senders who do a bit of a “bonus” in their sender reputation systems so it requires more evidence of bad behaviour to get the spam label compared to senders who don’t. ↩
-
Emails actually have two different addresses to indicate the sender, denoted the “From” address and the “Reply-To” address6. These do pretty much what they say they do: the “From” address is who wrote the email and the “Reply-To” is where any replies to the email should get sent. When you reply to the email in your email client, it will use the “Reply-To” address for the reply. ↩
-
This is a rather simplified description, of course! Email may pass through a number of intermediate servers on the way to its destination (just like postal mail). But it’s close enough for folks that aren’t implementing email systems. ↩
-
If you’re having difficulty finding this information or if you think your provider is worth adding to this page, please get in touch with us. ↩
-
You’ll have to send some email during this period from all of your email providers and check with the recipients that it came through properly and didn’t get marked as spam. ↩
-
This is also a lie. There are actually three. In addition to the “From” and “Reply-To” addresses in the email header, there is also a third “envelope from” address. This address is send as part of the protocol (called SMTP) that email servers use to talk to each other. It is this envelope address that SPF and DKIM act on.7 ↩
-
DMARC, unlike the other two, operates on both the envelope- from address and the From header address. By defining a DMARC record for the domain, you are requesting that a server which receives the email should check that the From address and envelope-from addresses have the same domain. Without DMARC, nothing else requires them to match! ↩